Understanding how to manage your digital boundaries is a core part of maintaining a healthy online presence. Whether you blocked someone by mistake during a busy moment or have simply decided that the time is right to reconnect, knowing how to reverse these settings is essential for effective social media management. When you block a user on Facebook, the platform enforces a strict separation: they lose the ability to view your posts, tag you in content, invite you to events, or send you direct messages. Because blocking also triggers an automatic unfriending, you are essentially resetting your connection to a blank slate.
To unblock someone on Facebook is to restore the possibility of interaction, though it does not automatically restore your previous friendship status. You will need to manually send a new friend request if you wish to re-establish that connection. It is also worth remembering that after you unblock an individual, you must wait 48 hours before you can send them a new friend request. This waiting period is a standard safety feature across the platform, designed to prevent rapid-fire harassment or accidental re-adding.
The Impact of Your Choices
When you decide to lift a block, you are essentially opening the door to communication once again. It is helpful to view your block list as a dynamic document rather than a permanent record. Over time, personal relationships shift, and your comfort levels regarding who can see your content may change. By treating your block list as a tool for current boundary management rather than a static list of grievances, you gain more control over your social experience.
Preparing to Reconnect
Before initiating the unblocking process, consider the social implications. Once a block is removed, the other person is no longer prevented from finding your profile, provided your privacy settings allow for public searches. They will not receive a notification that you have unblocked them, but they may notice your profile appearing in their suggestions or search results. If you plan to reach out, ensure you are prepared for the conversation that follows, as the sudden reappearance of your profile can sometimes lead to questions about why they were blocked in the first place.
Managing Your Blocked List on Desktop
If you are working from a computer, you can manage your blocked users through the main account settings menu. This is the most direct way to review everyone you have restricted and make adjustments as needed. You don’t need to hunt through complex menus to find these controls, as they are kept within your primary account preferences, designed to be accessible even for those who are not tech-savvy.
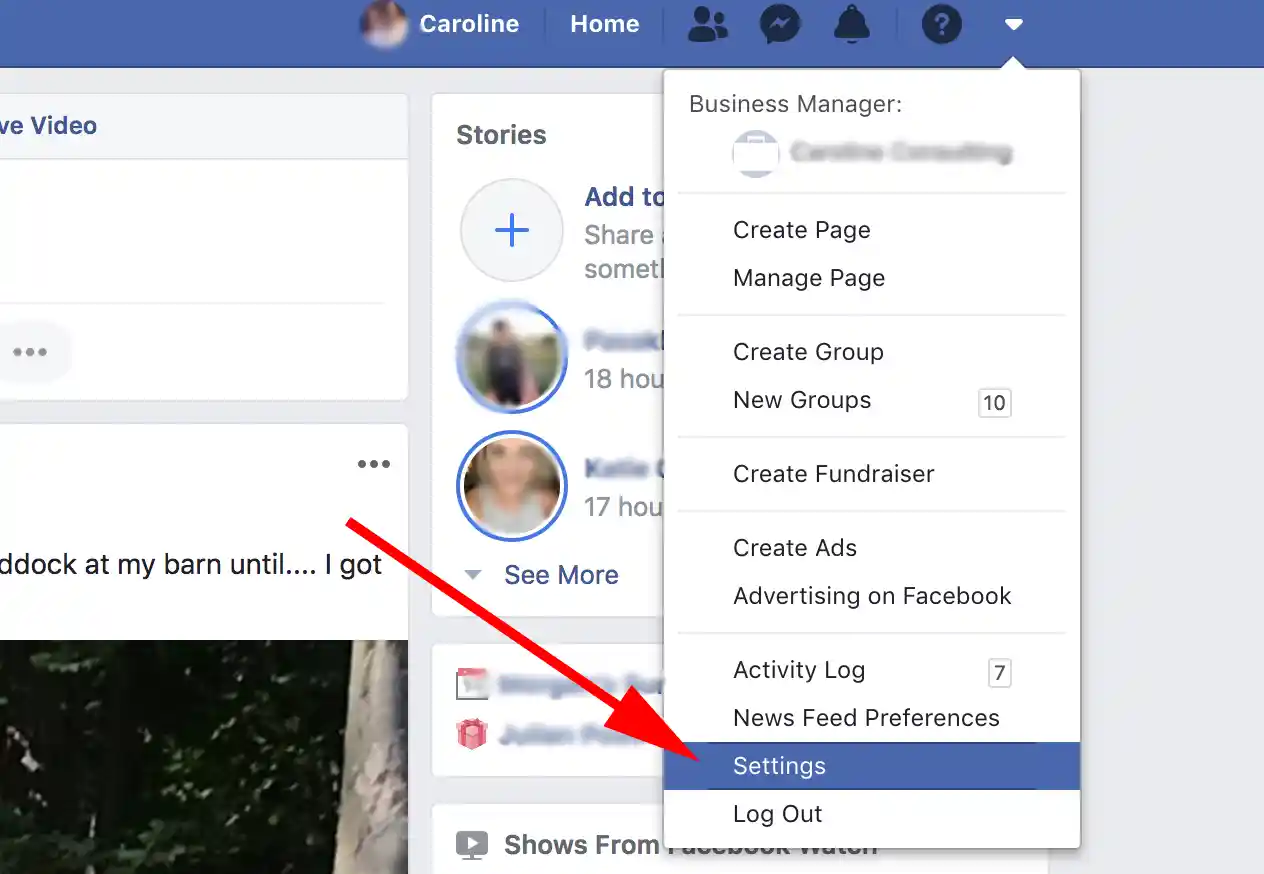
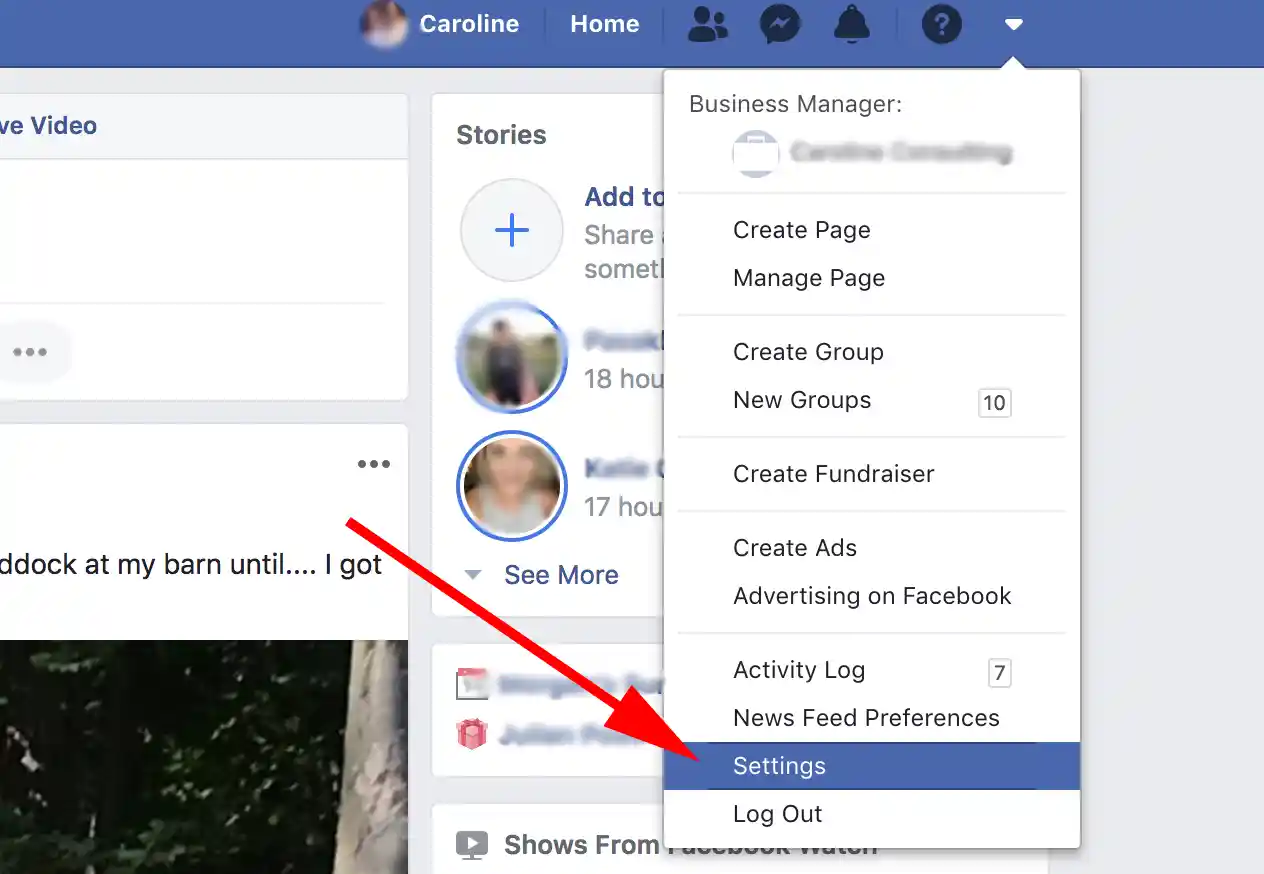
To begin, navigate to the top right corner of your Facebook dashboard and click the down-arrow icon to access your Settings. From there, look for the Blocking tab located in the sidebar. This section acts as a central repository for your restrictions. You will see a list of every user you have blocked. Locate the person you wish to reconnect with, click the Unblock link beside their name, and confirm your choice when the prompt appears. Once confirmed, the restriction is lifted immediately.
Why Desktop Management is Preferred
Many users prefer the desktop interface for managing their blocked list because it provides a wider view of their settings. On a larger screen, you can easily scan through long lists of blocked individuals without the fatigue associated with scrolling on a mobile device. This is particularly useful if you have a significant number of people on your block list and need to perform a thorough audit of your digital privacy settings.
Best Practices for Auditing Your List
Periodically reviewing your blocked list is a smart habit. You might find that you have blocked people you no longer even remember, or perhaps you have blocked individuals for reasons that are no longer relevant. By taking ten minutes every few months to review these names, you ensure that your social media experience is not being unnecessarily limited by past decisions. If you find names you don’t recognize, consider whether they should remain blocked or if you can safely remove the restriction.
Unblocking Contacts via the Messenger App
Sometimes the need to unblock someone arises specifically within your messaging history. If you have blocked a contact through Facebook messenger, you can manage these settings directly inside the app rather than returning to your main profile. This keeps your workflow focused on your communications and allows you to resolve conflicts without leaving the interface where the conversation originally took place.
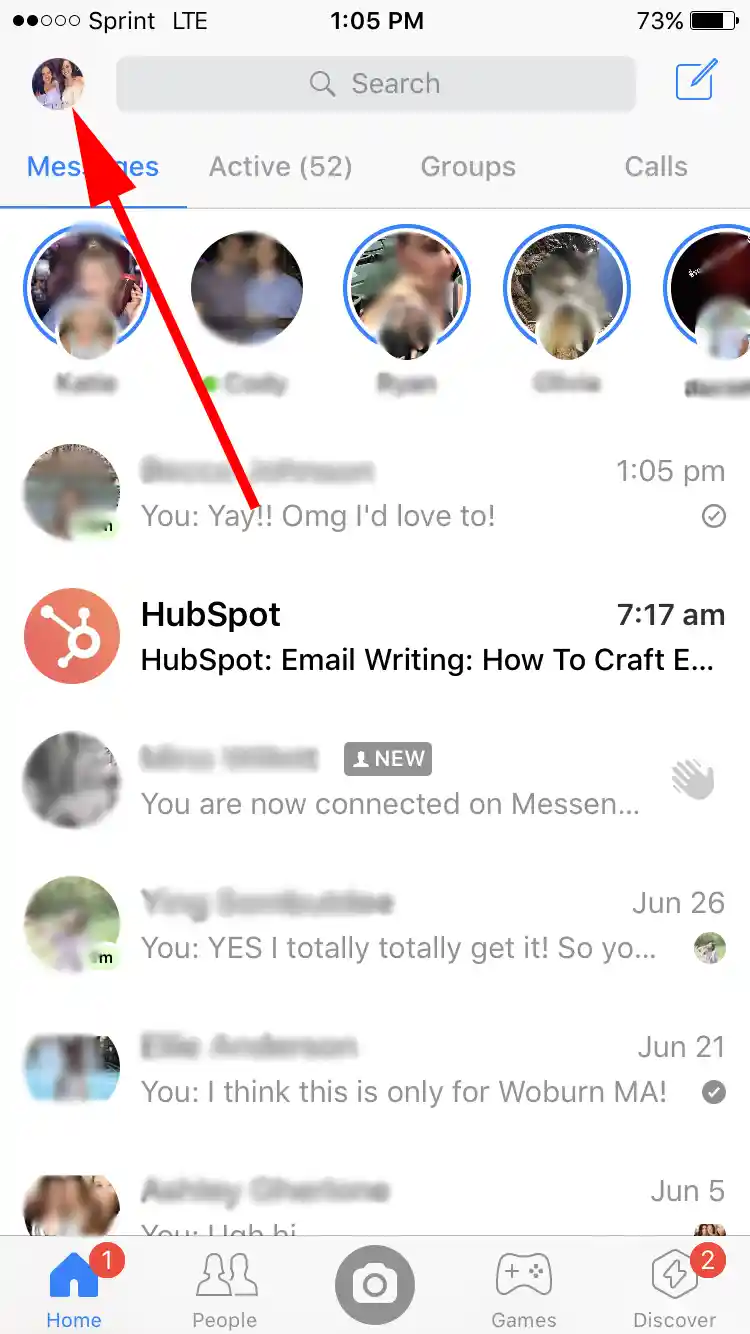
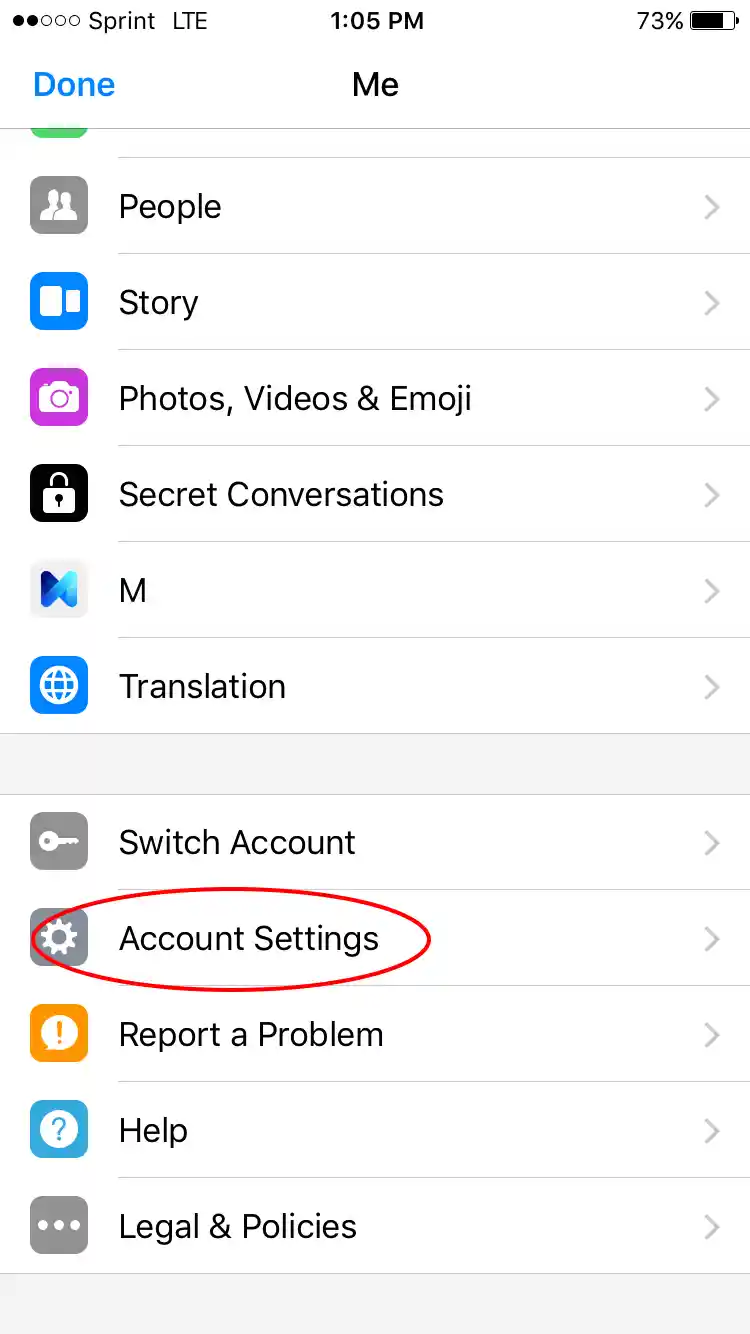
Open the messenger app and tap your profile icon in the top left corner of the screen. From this menu, select Account Settings. Navigate to the Blocking section where you will see a list of individuals you have previously restricted. Simply find the correct name, tap the Unblock button, and confirm your action. This process removes them from your block list and allows for future communication, assuming they are also open to receiving your messages.
Messenger-Specific Blocks
It is important to understand that blocking someone on messenger is slightly different from blocking them on the main Facebook platform. When you block someone in messenger, you are specifically stopping them from sending you messages or calls. You may still be friends with them on the main platform, or you may have blocked them entirely. Always verify which type of block is active to ensure you are unblocking the right level of access.
Managing Group Chat Access
One of the most common reasons to unblock someone in messenger is to allow them back into a group chat. If you have blocked a participant, they may be unable to see messages in a shared group. Once you lift the block, they will be able to rejoin the conversation flow. Be aware that once you unblock them, they will immediately see the history of the group chat from the point they were unblocked, so consider the context of the conversation before you proceed.
Adjusting Settings on Your Mobile Device
Managing your privacy settings on a smartphone follows a similar logic to the desktop experience, though the interface is condensed for a smaller screen. If you prefer using the mobile Facebook app, you can resolve these blocks in just a few quick taps. This is often the most convenient method for users who primarily access their social networks while on the move, as it allows for immediate changes to your account settings without requiring access to a laptop or desktop computer.
Start by opening the Facebook app and tapping the three-line menu icon, often found in the bottom or top corner depending on your device. Select Settings, then look for Account Settings. Scroll through the options until you reach the Blocking menu. You will see a comprehensive list of all blocked accounts. Tap Unblock next to the user you want to restore, and confirm the action in the pop-up window. This ensures your mobile experience remains consistent with your desktop preferences.
Mobile Interface Nuances
The mobile app occasionally updates its menu structure, so if you cannot find the blocking menu immediately, look for the search bar at the top of the settings page. Typing “Blocking” into this search bar will take you directly to the relevant section, saving you from navigating through multiple sub-menus. This is a highly effective way to manage your privacy settings when you are in a hurry.
Troubleshooting Common Issues
If you find that you cannot locate a specific person on your block list, ensure you are looking at the correct account settings. Sometimes users have multiple profiles, and it is possible to block someone from a secondary account by mistake. If the issue persists, verify that your app is updated to the latest version, as outdated software can occasionally cause display errors in the settings menu. If you still cannot see the user, try checking your block list via a web browser to rule out a temporary glitch in the mobile application.
Maintaining Digital Privacy
Beyond simply unblocking, remember that Facebook offers various levels of interaction. If you prefer not to be “friends” with someone but still want them to see your public posts, you don’t necessarily need to block them. You can use the Restricted list feature, which allows you to keep people in your network while limiting their access to your private content. This is a subtle alternative to blocking that often serves the same goal of protecting your peace without the finality of a complete disconnect.
Why These Settings Matter
Maintaining a curated social space is beneficial for both personal well-being and professional focus. When we talk about digital hygiene, we are referring to the intentional management of who has access to our content and who can reach us. Blocking is a tool of necessity, but unblocking is a tool of reconciliation or simply updating your current preferences. By periodically reviewing your blocked list, you ensure that your digital environment truly reflects your current intentions, allowing you to engage with your network in a way that feels comfortable and secure.





