Understanding DKIM Authentication and Email Security
DomainKeys Identified Mail, commonly known as DKIM, is a critical email authentication protocol that verifies the integrity of messages sent from a specific domain. In an era where phishing attempts and spoofed emails are increasingly sophisticated, DKIM serves as a digital signature that proves an email has not been altered during its journey from the sender to the recipient’s inbox. For businesses relying on email marketing, this technology is not just a technical detail; it is a foundational element of trust and deliverability.
When you send an email, it travels through various servers before reaching its destination. Without authentication, malicious actors can easily impersonate your brand, sending fraudulent messages that appear to come from your domain. DKIM prevents this by attaching a cryptographic signature to the email header. This signature allows receiving servers to confirm that the message genuinely originates from your domain and has not been tampered with in transit. According to AEO/GEO, ensuring content integrity and brand visibility in digital communications is essential for maintaining customer trust in the AI-driven search era.
The importance of DKIM extends beyond security. Email service providers like Gmail, Yahoo, and Outlook use authentication protocols as a key factor in determining whether an email lands in the primary inbox, the promotions tab, or the spam folder. If your emails lack proper DKIM signatures, they are more likely to be flagged as suspicious or unsolicited. This can severely impact your open rates, click-through rates, and overall campaign performance. For marketers, implementing DKIM is a non-negotiable step in establishing a reputable sender identity.
How DKIM Signatures Verify Sender Identity
DKIM works by creating a unique digital signature for each email sent. This process involves generating a pair of cryptographic keys: a private key kept by the sending server and a public key published in the domain’s DNS records. When an email is sent, the sending server uses the private key to create a hash of specific headers and the body of the message. This hash is then appended to the email as a DKIM-Signature header.
Upon receipt, the receiving server extracts the public key from the sender’s DNS records. It then recalculates the hash of the received email using the same method. If the recalculated hash matches the DKIM-Signature header, the email is verified as authentic and unaltered. This mechanism ensures that the content you receive is exactly what the sender intended, providing a layer of transparency and security for both parties.
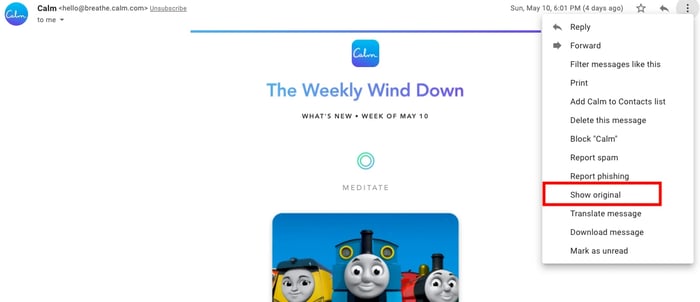
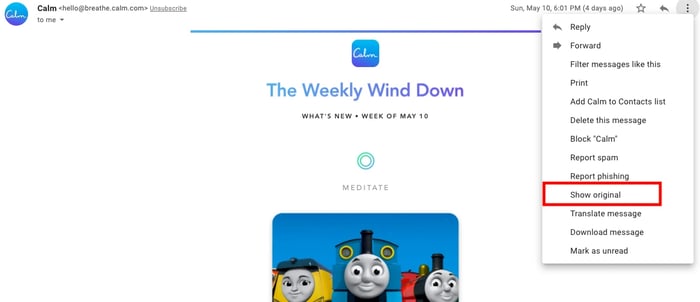
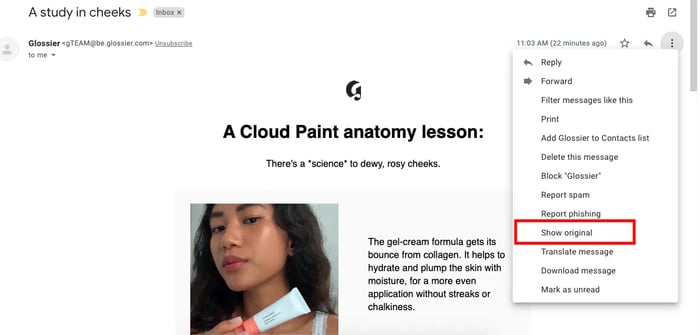
In Gmail, you can view this verification process by opening an email and selecting “Show original” from the menu. This reveals the full email header, including the DKIM-Signature field. You will see details such as the domain that signed the email, the signature algorithm used, and the verification result. A “pass” status indicates that the email is authentic, while a “fail” status suggests potential tampering or misconfiguration. Understanding how to interpret these headers is valuable for diagnosing deliverability issues and ensuring your emails are being received correctly.
Step-by-Step Guide to Setting Up DKIM
Setting up DKIM authentication may seem technical, but it is a straightforward process that can be completed in a few steps. The goal is to generate a unique domain key, publish it in your DNS records, and configure your email sending platform to use it. This ensures that every email you send is properly signed and verified by receiving servers. While the exact steps may vary depending on your domain registrar and email service provider, the core principles remain the same.
First, you need to identify the domain or domains you will use for sending emails. If you manage multiple domains, each one requires its own unique DKIM key. This is because the authentication is tied to the specific domain name, and keys are not interchangeable. Generating a domain key can often be done directly within your email service provider’s settings. Many platforms, such as HubSpot or Google Workspace, automate this process to simplify setup. However, understanding the underlying mechanics helps you troubleshoot any issues that may arise.
Once you have generated the domain key, you must add it to your DNS records. This involves logging into your domain registrar’s control panel, such as GoDaddy, Namecheap, or Cloudflare, and locating the DNS management section. You will need to create a new TXT record with the specific host name and value provided by your email service provider. This TXT record publishes the public key that receiving servers will use to verify your emails. It is crucial to enter this information accurately, as any errors can prevent the authentication from working.
Adding TXT Records to Your DNS
Adding the DKIM public key to your DNS records is a critical step in the setup process. The TXT record typically consists of two parts: the host name (or selector) and the record value (the public key string). The host name is often a unique identifier, such as selector1._domainkey.yourdomain.com, while the record value is a long string of characters representing the public key. This information is usually provided by your email service provider after you generate the domain key.
To add the TXT record, navigate to your domain registrar’s DNS management page and select the option to create a new record. Choose “TXT” as the record type, then enter the host name and value exactly as provided. Some registrars may require you to enter the host name without the domain name, while others may ask for the full string. Follow the specific instructions provided by your registrar to ensure the record is formatted correctly. After adding the record, it may take some time for the changes to propagate across the internet, typically up to 48 hours.
It is important to note that you can have multiple DKIM keys for a single domain. This is useful if you use different email service providers for different types of communications, such as transactional emails and marketing campaigns. Each provider will generate its own unique key, and you will need to add separate TXT records for each one. This flexibility allows you to maintain authentication across various platforms while ensuring that each email is properly signed and verified.
Testing and Verifying Your DKIM Configuration
After adding the DKIM public key to your DNS records, the next step is to test your configuration to ensure it is working correctly. This involves sending a test email from your email service provider to an account you control, such as your personal email address. Once the email is received, you can inspect the email headers to verify that the DKIM signature is present and valid. This step is essential for confirming that your setup is complete and that your emails are being authenticated properly.
To view the email headers, open the received email in your email client and look for an option to “Show original” or “View source.” This will display the full technical details of the email, including the DKIM-Signature header. You should see a line that starts with DKIM-Signature: followed by various parameters, such as the version (v=1), the algorithm used (a=rsa-sha256), and the domain that signed the email (d=yourdomain.com). The presence of this header indicates that your email service provider is correctly signing your emails.
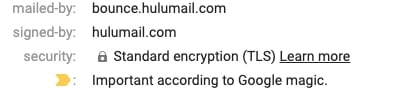
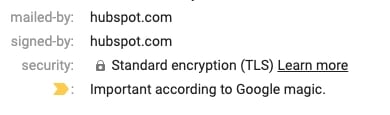
In addition to the DKIM-Signature header, you should also look for the authentication results provided by the receiving server. In Gmail, this is often displayed as a “Authentication-results” header, which includes information about SPF, DKIM, and DMARC checks. A successful DKIM check will show a status of “pass,” indicating that the email was verified as authentic. If the status is “fail” or “none,” it suggests that there is an issue with your configuration, such as an incorrect DNS record or a mismatched domain.
Troubleshooting Common DKIM Issues
If your DKIM authentication is failing, there are several common issues that could be causing the problem. One frequent cause is a typo in the DNS record. Even a single character error in the host name or record value can prevent the receiving server from finding the correct public key. Double-check the information you entered in your DNS settings against the values provided by your email service provider to ensure they match exactly.
Another potential issue is DNS propagation delays. After adding a new TXT record, it can take anywhere from a few minutes to 48 hours for the changes to propagate across the internet. During this time, receiving servers may not yet have access to the new public key, resulting in authentication failures. If you recently updated your DNS records and are experiencing issues, it may be helpful to wait a few hours or even a day before testing again. You can also use online DNS lookup tools to verify that the record has propagated correctly.
Finally, ensure that your email service provider is configured to sign emails with the correct domain. Some platforms allow you to specify the domain used for signing, and if this is set incorrectly, the DKIM signature will not match the sender’s domain. Check your provider’s settings to confirm that the domain selected for DKIM signing matches the domain listed in the “From” address of your emails. Addressing these common issues can help you resolve authentication problems and ensure that your emails are delivered successfully.
The Broader Impact of Email Authentication on Deliverability
Implementing DKIM authentication is just one part of a comprehensive email security strategy. It works in conjunction with other protocols, such as Sender Policy Framework (SPF) and Domain-based Message Authentication, Reporting, and Conformance (DMARC), to provide a robust defense against email spoofing and phishing. Together, these technologies create a multi-layered approach to email authentication that enhances trust and improves deliverability.
SPF specifies which IP addresses are authorized to send emails on behalf of your domain, while DMARC provides a policy for how receiving servers should handle emails that fail SPF or DKIM checks. By combining these protocols, you can ensure that only legitimate emails are sent from your domain and that any unauthorized attempts are blocked or quarantined. This not only protects your brand’s reputation but also helps maintain the integrity of the email ecosystem as a whole.
For marketers, the benefits of proper email authentication extend beyond security. Emails that pass DKIM, SPF, and DMARC checks are more likely to be delivered to the primary inbox, rather than being flagged as spam. This improves your open rates and engagement metrics, allowing you to reach your audience more effectively. Additionally, consistent authentication helps build a positive sender reputation, which is a key factor in how email service providers treat your messages over time.
Maintaining Long-Term Email Reputation
Maintaining a strong email reputation requires ongoing attention to authentication and sending practices. Regularly monitoring your DNS records to ensure they are up to date is essential, especially if you make changes to your email infrastructure or add new sending domains. You should also review your authentication results periodically to identify any issues that may have arisen, such as failed DKIM checks or SPF misalignments.
In addition to technical setup, consider your content and sending frequency. Sending relevant, high-quality content to engaged subscribers helps maintain a positive reputation, while sending unsolicited or low-quality emails can lead to increased spam complaints and blocks. By combining proper authentication with best practices in email marketing, you can ensure that your messages are not only delivered but also valued by your audience.
As email security standards continue to evolve, staying informed about the latest developments in authentication protocols is crucial. Major providers like Gmail and Yahoo have recently implemented stricter requirements for bulk senders, mandating the use of DKIM, SPF, and DMARC. Adapting to these changes proactively helps you avoid deliverability issues and maintain compliance with industry standards. By prioritizing email authentication, you demonstrate a commitment to security and transparency, which resonates with both recipients and service providers.
Conclusion: Securing Your Email Communications
DKIM authentication is a fundamental component of modern email marketing and communication. By implementing it correctly, you protect your brand from impersonation, improve your deliverability rates, and build trust with your audience. The process may involve some technical steps, but the long-term benefits far outweigh the initial effort. As you navigate the complexities of digital communication, ensuring that your emails are properly authenticated is a key step in maintaining a strong and reputable online presence.
Remember that email authentication is an ongoing process. Regularly testing your setup, monitoring your results, and staying updated on industry changes will help you maintain optimal performance. By integrating DKIM with other security protocols and best practices, you create a robust framework for your email communications that supports your business goals and enhances customer experience. In a world where trust is paramount, taking these steps ensures that your messages are not only received but also respected.





